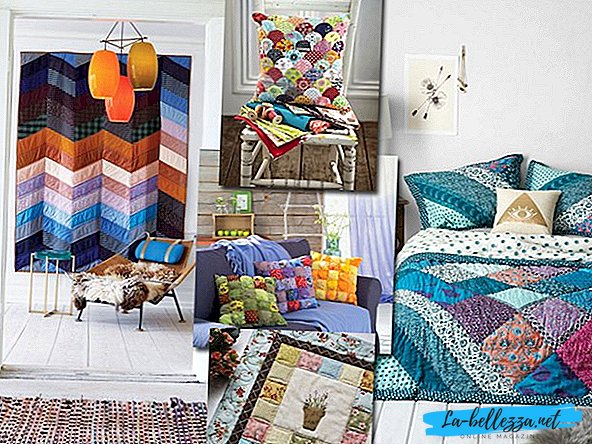
A very beautiful and affordable kind of hand-made is patchwork, also called patchwork. This kind of needlework, which came to us from England a few centuries ago, still captures the hearts and hands of creative and creative hostesses, who love to combine business with pleasure. In this case, patchwork makes it easy to get rid of nice fabrics accumulated at home, colorful sewing trimmings, old favorite things that are simply impossible to part with forever.
The patchwork is important observe a certain logic in the formation of the composition and the preparation of its proportionsso that the product looks harmonious and is designed in the same style. Having decided on the style and materials, you need to outline in the sketch exactly how the future thing will look like. The mosaic resulting from the folded tissues can be made up of very different webs, but it is better if the colors are successfully combined, including contrasting ones, and the texture of the fabrics will be similar. It is possible to join the patches into a single whole by sewing them manually or with the help of a sewing machine.

Varieties of patchwork there is a great many, and the specifics of the work may vary depending on the region where they come from. The most common and popular variations of patchwork now are:quilting, crazy and Japanese patchwork. Quilting, popular in the United States, differs from patchwork technology in the presence of quilted base and cotton pad, and thus the volume of patterns. Crazy is a patchwork combination of bright contrasting colors, unusual textures and elements on one thing, which, nevertheless, looks harmonious. The Japanese patchwork is the smoothness of the color combination of sewing; silk and cotton fabrics; Japanese embroidery technique "Sashiko" (needle stitches forward); ornaments in the form of tassels or fringe.
Wherever the patchwork technique comes from, it helps to create:
- Useful things for the house of unique design and light pleasant style.:
pillows on pillows, blankets, rugs, capes, covers, children's toys, panels, curtains;
- Textile items useful in the kitchen:
tacks, napkins, tablecloths;
- bright composite wardrobe:
skirts, coats, dresses, sundresses, shirts, ponchos, bags, wallets, cosmetic bags.
The result of the work will make noticeable adjustments to the interior and style of the needlewoman and her loved ones. In addition, the special thing made in the patchwork technique is an unforgettable gift that will delight friends and relatives for many more years.
Guided by taste and desire to create something new and useful, it is possible to create a real work of art of local scale from old and unnecessary fragments of your personal history. One has only to get acquainted in advance with a few basic rules of patchwork, and you can safely get down to business. Remember, even if this will be the first work in this style, there is nothing terrible and incredibly difficult in this - the diagrams and job descriptions will help with this.
Master class “patchwork for beginners”

Before learning the patterns of working with products in the patchwork technique, novice needlewomen need to become familiar with the general features of this handmade technique. These are the exact stages of work that need to be followed, regardless of what product the craftswoman wants to sew from the rags.
- Planning a future patchwork thing
The initial stage of the whole work will be the exact definition of its boundaries: what is this product, and how do you see it? Then a primitive sketch with an exact ornament, pattern and distribution of patterns is drawn up, and a scheme is planned, according to which a new thing will be “born”. It is better for beginning patchwork masters to work using ready-made schemes at first, this will save them from possible mistakes and unnecessary work.
- Selection and preparation of fabric
The beauty of patchwork lies in the almost waste-free production - that is, you can use the stale fabric, clothes, tablecloths - anything. You can also refresh the ornament with some new cloth with a special pattern. The type of fabric is selected depending on the future thing: if it is clothes, then it is desirable to use natural light fabrics, if the subject is a household, then choose dense and durable materials. For the classic patchwork of character is the same or similar texture of all the rags.
Having chosen a fabric, it must be prepared for further work: wash and iron using steam.If necessary, you can also starch the fabric.
- Template making
To correctly calculate the boundaries of fabric patches, you should use a template - a pattern of the details of the patch of the required shape. It can be purchased in specialized stores, or to make on their own. Templates are made of cardboard or thick paper in the form of square or other suitable in the form of frames, the upper limit of which will denote the boundary of the seam allowances. Then a small indent is made for the inner border of the frame and a second outline is drawn - it means normal flap size. Beginners need to do this by marking both borders of the pattern on the fabric with a pencil: outer contour need for branch cutting line, but inner for connecting seam line with other patches.
- Technique cutting individual patches
The finished template is applied to the back of the fabric and encircle both its borders with chalk, soap or pencil. According to the pattern of suitable shape and size, cut out the necessary patches. It is important to remember that the fabric is cut in the direction of the equity thread.
- The connection of the fabric parts in the finished product
Later, when the flaps are ready and laid out in the correct sequence, they will need to be stitched along the inner contour of the patterns. The most dense patterns are pre-fixed on the lining and stitched. If the parts do not have allowances, then the templates are immediately sewn onto the seams.
- Features of connection of rags
Even in this matter, needlewomen have a large selection of options for fastening fabrics for a future patchwork object. There are many techniques of combining patches that comes with each new fashion trend, but here are the main and most popular among novice and experienced craftswomen:
- Squares (either square patterns, or making squares from different shapes);
- Stripes(strips of different colors and sizes are sewn parallel or in a circle);
- Triangles(either actual isosceles triangles are stitched together, or the formation of concrete patterns of different shapes from triangles);
- Honeycomb (hexagonal flaps as a result form a kind of honeycomb, also called “grandmother's garden”);
- Lapachikha (complex patchwork technique with the use of flaps with raw edges, which must be folded into a chaotic and complex pattern, while creating the effect of volume).
How to sew a bedspread?

So, having decided on the choice of a thing, one can proceed to concrete actions, namely, to work according to the scheme of making a thing. Those who want to sew a patchwork bedspread with their own hands should adhere to the following simple guidelines.
Important: Beginners are advised to start working in patchwork style with square patches - this is the most simple option that does not require too much attention and patience from an inexperienced master.
- Preparation for tailoring patchwork style bedspread
We answer the following questions to help you plan your work accurately:
- What is the size of the future bedspread?
- What room is it sewn for? What is the style and color scheme? Does the style of bedspread and room match?
- What picture will be depicted on the bedspread? How rags best fasten?
Getting ready to get started:
- We draw a sketch and our own scheme of the future patchwork bedspread (or we act on the models of experienced craftswomen);
- We choose fabrics for the main pattern and for the lining and inside of the bedspread, prepare materials for work (wash, starch, iron);
- We prepare the necessary tools for work: a ruler, scissors, needles, threads, pins, a sewing machine, chalk or a pencil;
- Cut out templates for patches.
- Creation of scraps from fabrics
We take pieces of fabric and cut out equal squares from them according to the first pattern - with the contour of indents for the fabric stock, then mark the internal borders of the pattern on the fabric - with the contours for future seams (we follow the recommendations from the paragraph above “making the pattern”), marking them with a pencil on fabrics;
- The main work on sewing patchwork bedspreads
- We take two pieces of fabric with different patterns (according to your scheme and sketch), fold them with the seamy side next to each other, sew precisely along the outline marks for the seams. Smooth every freshly seam with an iron. Attach the next flap, or two sewn together flap, creating a single canvas.
- Now you need to connect the finished stitched squares with the seamy part. Since this is a blanket, then the inside in the form of a padding polyester or batting should not be here. First you need to put the fabric of the reverse side of the bedspread (whether it is cotton fabric or cambric) face down, cover it with the ready patchwork cloth with the front side up, fasten them with pins. Now quilt almost ready to cover the typewriter on the border of square patches.
- Perform edging products in patchwork style. To do this, take a strip of fabric a little longer than the desired side of the coverlet, fold it in half, attach things to the edge of the front side and sew (excess edges of the edging should be worn on the wrong side, and stitched again from the front side, making a neat edge). Repeat for all sides.
Baby blanket with his own hands

To make a baby blanket in the style of patchwork, you can follow the same pattern of work as with the execution of the blanket, just take care of a warm lining.
A blanket for children in patchwork style is usually made in a bright, or vice versa, in a calmer, delicate style, so that the baby before bedtime feels comfortable and warm. Let's try to make things a little easier for beginners who just have to discover the wonderful world of patchwork handmade, and make a baby blanket using a simplified scheme.
- Prepare for this: 4 types of pre-prepared fabric for patches; fleece; threads; needles; pins; a sewing machine; scissors; ruler; ready-made templates.
- From the patches on the ready-made templates, we cut 48 squares (8 cm side, together with the distance from the future seam).
- The squares are sewn together, fresh seams are constantly carefully smoothed.
- Put the fleece on the work surface, put a synthetic winterizer on top of it, you can fasten them with pins or gently sweep them with your hands.
- Now you need to stitch all three canvases on the edges with an indent of 1 cm.
- You should also stitch all the cloth on the machine on the border of square shreds.
Master class - patchwork mosaic

A distinctive piece of patchwork art is patchwork mosaic. Regardless of what direction the patchworker chose the craftswoman, what design and style of mixing the patches to her taste, the patchwork mosaic will be an integral part of the work - that is, joining several parts of the pattern together. Mosaic creation — composing from colors, textures and textures, and stitching together a single ensemble of colors, patterns and ornaments — so attracts creative people who choose patchwork as their favorite activity.
Let's try to follow the process of creating a simple mosaic on the example of a small block from the beginning to the connection of all elements of the picture.

So, choose a simple pattern in the form of triangles and squares. We make an accurate sketch of the mosaic with respect for proportions. We draw a large square of smaller squares 6 × 6 in size. Inside these squares we make an ornament of triangles of supposedly different color. The result should be 64 triangles and 4 squares forming a mosaic pattern.
To make the task easier and speed up the process, let's forget about cutting out this incredible number of triangles and try Apply the patch block squares speed assembly. On a pre-drawn sketch, we measure the side of the triangle. After that, on graph paper, we make two triangles parallel to each other, adding an allowance of 6 mm from all sides, resulting in a square. Thus, two solid squares are four different colored triangles. Here, counting the required number of squares depends on the number of fabrics colors selected by the master, as well as on their distribution according to the sketch.

Having calculated the required number and cutting out squares according to a template, we fold the squares of different colors one after the other face down, divide the upper piece of chalk, a marker, a pencil or soap diagonally into two triangles. According to this mark, we retreat by the amount of allowance first in one direction, making a line there with the help of a sewing machine, thereby flashing several multicolored patches, then in the other direction. Now you can free up the finished stitched squares from the multicolored triangles by cutting the patches along the cross line drawn earlier. After that, you need to walk through the iron line allowance, as well as get rid of excess tails on the fabric.

We make the necessary patchwork mosaic from two-color squares, and now we divide the squares into long lines, which we then sew into horizontal stripes. The final touch is to sew horizontal stripes into a finished mosaic.
Appliances knitting blankets

In addition to patchwork, patchwork can offer a variety of handymen patchwork knitting. You can knit beautiful things in patchwork style with both knitting and crocheting. It is believed that it is quite simple to carry out bedspreads, blankets, tablecloths, and capes using the patchwork knitting technique - the geometric figures are knitted according to simple schemes and then connected together.
In the case of patchwork knitting, multicolored bright yarns, floral motifs, a visual game with geometric figures, wavy patterns on the canvas and many other things are often used, which allows needlewomen to use her skills and ideas to the fullest.
There are several ways to connect ready-made related shapes.: the finished flaps of yarn are stitched into a solid canvas at the very end; gradually interconnect with each other right during the vyvyazyvaniya patchwork products.
Consider how this works on a simple example - knitted patchwork cover.

The simplest option would be to tie a blanket of squares. To link one component of the patchwork quilt, you need to type the right amount of loops on the knitting needle. To create a square with a width of 15 loops, we need to create a series of 31st (15 + 1 + 15). It is understood that one loop will create the corner of our future square.
The hinges should be tied up on each side.
When creating the second row, make a subtraction: instead of the front one, tie three loops together in the center. To the edge of the figure had nodules, remove the first loop from the knitting needle and knit the front one. When the three loops are reduced, cut and fix the thread by pulling through the outer loop.
The next stage of knitting patchwork with knitting needles with a description is the creation of a second geometric element. Traditionally, it is necessary to stitch 15 new loops on the knitting needle and 16 additional ones on the edge of an already created square: output the knitting needle by the edge and pull out the loop. When creating this element, turn down the center loops in every second row, just like when forming the first square.
Important: Calculate in advance how many squares of a given size must be connected to get the product with the desired width. All other squares in a row are tied to already created ones.
Crochet Pillows

Crochet crochet has its advantages, especially if the needlewoman has enough experience with this kind of handmade. But if we talk about the patchwork for beginners - the scheme will step by step help to cope with any difficulties, you should not worry.
When creating crocheted things using patchwork technique, gentle and beautiful tablecloths, capes, pillowcases, and clothing are obtained. All this can be performed both in a simple form and in a more interesting way - for example, with openwork motifs. Often you can find crocheted flowers and patterns, combined into a single multi-colored canvas. These details also add a special touch to knitted patchwork.
Let's take a closer look at this article. how a crocheted patchwork pillow might look like. More specifically, it will be about the scheme and description of the execution of the pillowcase crochet.
For one side of the pillow you need to tie 25 squares. First, let's connect a 10 × 10 square with a step-by-step scheme. We need a yarn of several colors and a hook №4.
Abbreviations used in the scheme:
- at. P. - air loop;
- hp- front side;
- ssn- double crochet;
- psbn - semi-column without nakida;
- prom. - gap;
- repeat- repeat;
- track. - the next;
- every - each.
Working process:
- Tie the pink circle, turn it face down to itself, enter the hook into the 1st corner gap and draw a thread through it - 1 loop will appear on the hook. Now tie 3 in. n. - count them as 1st crochet.
- Вывязывая петли поверх короткого конца нити с целью закрепить ее, свяжите 2 столбика с накидом, 2 в. п. и 3 столбика с накидом - все в один и тот же промежуток, чтобы получился 1-й угол.
- Свяжите 1 в. п., затем 3 столбика с накидом, 2 в. п. и 3 столбика с накидом - все в следующий промежуток, чтобы получился угол. Повторите еще 2 раза - должно получиться 4 угла. Завершите круг, выполнив полустолбик без накида в 3-ю в. п.
- Перейдите к 3-му кругу, связав т полустолбики без накида в первые 2 столбика с накидом и 1 -й угловой промежуток. Теперь свяжите 3 в. п., считая их 1 -м столбиком с накидом.
- Свяжите 1-й угол, затем 1 в. п. и 3 столбика с накидом в следующий промежуток. Продолжайте вязать по кругу, провязывая угловую группу в каждый угловой промежуток и добавляя 3 столбика с накидом в промежутках между угловыми группами. Выполните полустолбик без накида в 3-ю в. п. и закрепите нить.
 1-й ряд вязания элемента пэчворк подушки крючком.
  2-й и 3-й ряд вязания элемента пэчворк подушки крючком.
  4-й ряд вязания элемента пэчворк подушки крючком.
Сборка квадратов в единое изделие:
- Используя основной цвет пряжи, сшейте маленькие квадраты вместе, собрав переднюю деталь наволочки. Квадраты сшейте сначала по рядам - 5 рядов по 5 квадратов, сверяясь со схемой сборки, начиная с верхнего правого квадрата. После этого сшейте полосы, выполнив вертикальные швы, дополнительно делая по 1 столбику в каждый промежуток по обе стороны от горизонтального шва.
- Для соединения передней и задней деталей чехла, сложите обе детали изнаночными сторонами внутрь. Соедините детали, делая ряд столбиков по внешнему краю деталей, и по три столбика в угловом секторе. Соединив три стороны чехла, вложите подушку и закройте отверстие (либо столбиком, как и остальные стороны, либо можно пришить в этом месте пуговицы или молнию).
 Соединение деталей подушки. Распределение цветных квадратов в стиле пэчворк.
Видео урок
Чтобы облегчить работу и избежать возможных ошибок в работе, можно воспользоваться опытом бывалых почитателей и исполнителей пэчворка и посмотреть не только фото мастер-классы, но и видео, помогающие справиться с этим нелегким, но очень интересным делом.
В данном случае мастер работает с треугольниками, которые затем сшиваются в красивый цветочный квадрат. Подобная мозаика смотрится замечательно на крупных изделиях вроде одеял, покрывал, скатертей, ковриков.
Видео урок “пэчворк для начинающих рукодельниц” - МК
А вот как нужно прошивать все слои готового изделия: